How to Use EPSON LFP Remote Panel / Media Adjustment
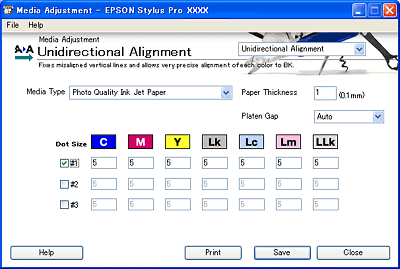
Unidirectional Alignment Dialog Box
Click the Unidirectional Alignment button in the Media Adjustment dialog box to display the Unidirectional Alignment dialog box.
If you find misaligned lines or black or white banding on the printed data, you may be able to solve these problems by using the Bidirectional Alignment utility and then this utility to align the print head.

Unidirectional Alignment fixes misaligned vertical lines caused by unidirectional printing and achieves very precise alignment of the standard color and each color. The standard color is different depending on the printer model.
 |
Note:
|
 | -
The screens that appear in this manual may differ according to your printer model.
|
|
| -
Perform Bidirectional Alignment first. If you are not satisfied with the alignment, then perform the Unidirectional Alignment.
|
|
| -
Black is not shown in the Unidirectional Alignment dialog box because its position is used as standard for the positions of the other colors.
|
|
| -
To go to another dialog box, select the dialog box from the drop-down list box in the top right area.
|
|
 |
Select the media type from the Media Type list box. If you use non-Epson special media, select Other.
|
| |
Note:
|
| | |
If your printer is set to the four colors ink combination, the printer will be in four color mode and the screen above shows only four colors.
|
|
 |
Set the Paper Thickness.
|
If you selected Epson special media, the value appears automatically.
If you selected Other (non-Epson special media) for Media Type, type a value from 1 to 15 in the Paper Thickness text box. For paper thickness information, see the specifications or contact the dealer for the media.
| |
Note:
|
| | |
The units for the value are 0.1 mm. Therefore, you can specify a thickness from 0.1 to 1.5 mm.
|
|
 |
Select the Platen Gap. Platen Gap is the height from the media loaded in the printer to the print head. By adjusting this parameter, you may produce better print quality.
|
| |
Note:
|
| | -
Setting Platen Gap to Narrow may produce better print quality, but make sure that the media does not wrinkle or touch the print head. Otherwise, the printed document or the print head surface may be damaged. Use Standard or Wide in such case.
|
|
| | -
If you selected Other for Media Type, Platen Gap is disabled until the Paper Thickness is set.
|
|
The following table shows which Platen Gap option is available for the paper thickness.
|
|
Platen Gap Options
|
|
Paper Thickness (mm)
|
Narrow
|
Standard
|
Wide
|
Wider
|
|
0.1 to 0.3
|

|
|
|
|
|
0.4 to 0.8
|
N/A
|
|
|
|
|
0.9 or more
|
N/A
|
N/A
|
N/A
|
|
 |
Select an ink dot size from #1 to #3 depending on the media you use and the print quality you want to try. See Ink dot size to find out which parameter is available for the media and print quality.
|
| |
Note:
|
| | |
If you use non-Epson special media, we recommend that you select all check boxes from #1 to #3 to align all dot sizes.
|
|
 |
Select the check box on the left to your selected number, from #1 to #3. The corresponding row will be enabled.
|
 |
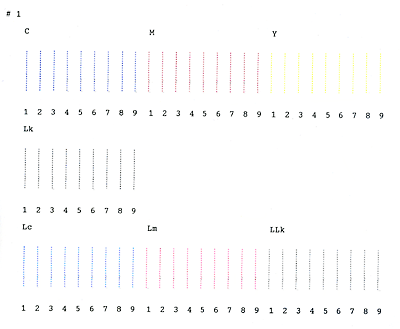
Click Print to print an alignment sheet.
|
 |
Look at the alignment sheet. For each color, find the vertical straight line formed when the dotted line of the standard color aligns well with the dotted line of the respective color. The standard color is different depending on the printer model.
|
| |
Note:
|
| | |
The alignment sheet is different depending on your printer model.
|
|
 |
Enter the number of each aligned pattern in the corresponding boxes.
|
If you cannot find a properly aligned pattern, enter the number of the pattern that is closest to being aligned for that box.
 |
Repeat the steps 7 and 8 for all colors.
|
 |
Click the Save button. If an on-line error message appears, select STANDARD for the platen gap setting from the control panel of the printer. For the control panel operation, refer to the Reference Guide of the printer.
|

[Top]

