 Ink dot size
How to Use EPSON LFP Remote Panel / Media Adjustment
Ink dot size
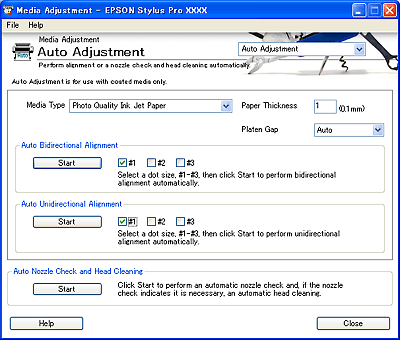
Click the Auto Adjustment button in the Media Adjustment dialog box to display the Auto Adjustment dialog box.
You can perform automatic Nozzle Check and Head Cleaning, Bidirectional Alignment, or Unidirectional Alignment for coated media in this dialog box.

| Note: |
|
|
|
| Note: |
|
 | Select the Media Type. If you use non-Epson special media, select Other. |
 | Set the Paper Thickness. |
If you selected Epson special media, the value appears automatically.
If you selected Other (non-Epson special media) for Media Type, type the value of the media from 1 to 15 in the Paper Thickness text box. For paper thickness information, see the specifications or contact the dealer for the media.
| Note: |
|
 | Set the Platen Gap. Platen Gap is the height from the media loaded in the printer to the print head. By adjusting this parameter, you may produce better print quality. |
| Note: |
|
|
The following table shows which Platen Gap option is available for the paper thickness.
|
|
Platen Gap Options |
|||
|
Paper Thickness (mm) |
Narrow |
Standard |
Wide |
Wider |
|
0.1 to 0.3 |
|
|
|
|
|
0.4 to 0.8 |
N/A |
|
|
|
|
0.9 or more |
N/A |
N/A |
N/A |
|
 | Select an ink dot size from #1 to #3 depending on the media you use and the print quality you want to try. See Ink dot size to find out which parameter is available for the media and print quality. |
| Note: |
|
 | Select the check box on the left to your selected number, from #1 to #3. |
 | Click Start to perform automatic Bidirectional Alignment. |
| Note: |
|
|
 | Select a media type for the Media Type setting. If you use non-Epson special media, select Other. |
 | Set the Paper Thickness. |
If you selected Epson special media, the value appears automatically.
If you selected Other (non-Epson special media) for Media Type, type the value of the media in the Paper Thickness text box, from 1 to 15. For paper thickness information, see the specifications or contact the dealer for the media.
| Note: |
|
 | Set the Platen Gap. Platen Gap is the height from the media loaded in the printer to the print head. By adjusting this parameter, you may produce better print quality. |
| Note: |
|
|
The following table shows which Platen Gap option is available for the paper thickness.
|
|
Platen Gap Options |
|||
|
Paper Thickness (mm) |
Narrow |
Standard |
Wide |
Wider |
|
0.1 to 0.3 |
|
|
|
|
|
0.4 to 0.8 |
N/A |
|
|
|
|
0.9 or more |
N/A |
N/A |
N/A |
|
 | Select an ink dot size from #1 to #3 depending on the media you use and the print quality you want to try. See Ink dot size to find out which parameter is available for the media and print quality. |
| Note: |
|
 | Select the check box on the left to your selected number, from #1 to #3. |
 | Click Start to perform automatic Unidirectional Alignment. |
Check if the ink jet nozzles are clogged. Click Start to perform an automatic Nozzle Check. If necessary, automatic Head Cleaning will be started.
| Note: |
|
Select an ink dot size from #1 to #3 depending on the media you use and the print quality you want to try. The following table shows which parameter is available for the media and print quality.
EPSON Stylus Pro 4400:
|
Media Name |
Print Quality |
|||||
|
Main Menu |
Custom Print Quality |
|||||
|
A |
B |
C |
D |
E |
F |
|
|
Photo Quality Ink Jet Paper |
#1 |
#2 |
- |
#1 |
#2 |
#3 |
|
Plain Paper |
#1 |
#2 |
#1 |
#1/#2 |
#2 |
- |
|
Plain Paper (line drawing) |
#1 |
#2 |
- |
#1/#2 |
#2 |
- |
|
Tracing Paper |
#1 |
#2 |
- |
#1 |
#2 |
- |
|
Photo Glossy Paper |
#2 |
#3 |
- |
- |
#2 |
#3 |
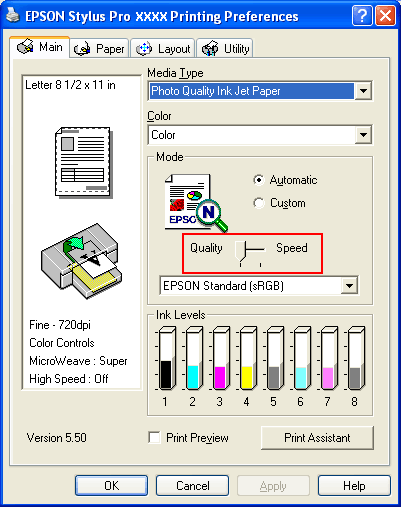
 1 Print Quality A: Speed, B: Quality, C: Draft, D: Normal-360dpi, E: Fine-720dpi, F: Super Fine-1440dpi 1 Print Quality A: Speed, B: Quality, C: Draft, D: Normal-360dpi, E: Fine-720dpi, F: Super Fine-1440dpi
|
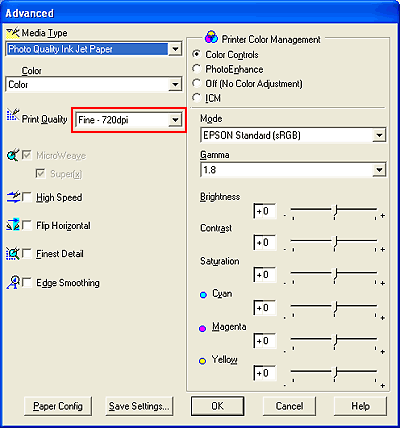
 2 When Super in the Advanced dialog box of the printer driver is selected, select #2. When Super is not selected, select #1. 2 When Super in the Advanced dialog box of the printer driver is selected, select #2. When Super is not selected, select #1.
|
EPSON Stylus Pro 4800:
|
Media Name |
Print Quality |
|||||
|
Main Menu |
Custom Print Quality |
|||||
|
A |
B |
C |
D |
E |
F |
|
|
Photo Quality Ink Jet Paper |
#1 |
#2 |
- |
#1 |
#2 |
#3 |
|
Enhanced Matte Paper |
#2 |
#3 |
- |
#1 |
#2 |
#3 |
|
Premium Glossy Photo Paper |
- |
#3 |
- |
- |
#2 |
#3 |
|
Photo Glossy Paper |
#2 |
#3 |
- |
- |
#2 |
#3 |
|
Textured Fine Art Paper |
- |
#3 |
- |
- |
- |
#3 |
|
UltraSmooth Fine Art Paper |
- |
#3 |
- |
- |
- |
#3 |
|
Plain Paper |
#1 |
#2 |
#1 |
#1/#2 |
#2 |
- |
|
Plain Paper (line drawing) |
#1 |
#2 |
- |
#1/#2 |
#2 |
- |
|
Tracing Paper |
#1 |
#2 |
- |
#1 |
#2 |
- |
 1 Print Quality A: Speed, B: Quality, C: Draft, D: Normal-360dpi, E: Fine-720dpi, F: Super Fine-1440dpi, Super Photo-2880dpi 1 Print Quality A: Speed, B: Quality, C: Draft, D: Normal-360dpi, E: Fine-720dpi, F: Super Fine-1440dpi, Super Photo-2880dpi
|
 2 When Super in the Advanced dialog box of the printer driver is selected, select #2. When Super is not selected, select #1. 2 When Super in the Advanced dialog box of the printer driver is selected, select #2. When Super is not selected, select #1.
|
EPSON Stylus Pro 7400 or 9400:
|
Media Name |
Print Quality |
|||||
|
Main Menu |
Custom Print Quality |
|||||
|
A |
B |
C |
D |
E |
F |
|
|
Singleweight Matte Paper |
#1 |
#2 |
- |
#1 |
#2 |
#3 |
|
Plain Paper |
#1 |
#2 |
#1 |
#1/#2 |
#2 |
- |
|
Plain Paper (line drawing) |
#1 |
#2 |
- |
#1/#2 |
#2 |
- |
|
Tracing Paper |
#1 |
#2 |
- |
#1 |
#2 |
- |
|
Photo Glossy Paper |
#2 |
#3 |
- |
- |
#2 |
#3 |
 1 Print Quality A: Speed, B: Quality, C: Draft, D: Normal-360dpi, E: Fine-720dpi, F: Super Fine-1440dpi 1 Print Quality A: Speed, B: Quality, C: Draft, D: Normal-360dpi, E: Fine-720dpi, F: Super Fine-1440dpi
|
 2 When Super in the Advanced dialog box of the printer driver is selected, select #2. When Super is not selected, select #1. 2 When Super in the Advanced dialog box of the printer driver is selected, select #2. When Super is not selected, select #1.
|
EPSON Stylus Pro 7800 or 9800:
|
Media Name |
Print Quality |
||||||
|
Main Menu |
Custom Print Quality |
||||||
|
A |
B |
C |
D |
E |
F |
G |
|
|
Photo Quality Ink Jet Paper |
#1 |
#2 |
- |
#1 |
#2 |
#3 |
- |
|
Enhanced Matte Paper |
#2 |
#3 |
- |
#1 |
#2 |
#3 |
#3 |
|
Watercolor Paper - Radiant White |
- |
#3 |
- |
- |
#2 |
#3 |
- |
|
Photo Glossy Paper |
#2 |
#3 |
- |
- |
#2 |
#3 |
#3 |
|
Textured Fine Art Paper |
- |
#3 |
- |
- |
- |
#3 |
#3 |
|
UltraSmooth Fine Art Paper |
- |
#3 |
- |
- |
- |
#3 |
#3 |
|
Canvas |
#2 |
#3 |
- |
- |
#2 |
#3 |
- |
|
Enhanced Matte Poster Board |
#2 |
#3 |
- |
- |
#2 |
#3 |
#3 |
|
Plain Paper |
#1 |
#2 |
#1 |
#1/#2 |
#2 |
- |
- |
|
Plain Paper (line drawing) |
#1 |
#2 |
- |
#1/#2 |
#2 |
- |
- |
|
Tracing Paper |
#1 |
#2 |
- |
#1 |
#2 |
- |
- |
 1 Print Quality A: Speed, B: Quality, C: Draft, D: Normal-360dpi, E: Fine-720dpi, F: Super Fine-1440dpi, G:Super Photo-2880dpi 1 Print Quality A: Speed, B: Quality, C: Draft, D: Normal-360dpi, E: Fine-720dpi, F: Super Fine-1440dpi, G:Super Photo-2880dpi
|
 2 When Super in the Advanced dialog box of the printer driver is selected, select #2. When Super is not selected, select #1. 2 When Super in the Advanced dialog box of the printer driver is selected, select #2. When Super is not selected, select #1.
|
| Note: |
|
For Print Quality, refer to the printer driver.


 Previous |
 Next |