
How to Use EPSON Printer Service Utility 2
If you find vertical misalignment in the printout as shown below, try the Bidirectional Alignment menu and then this menu.
Unidirectional Alignment fixes misaligned vertical lines by unidirectional printing and allows very precise alignment of seven colors. The position of black (Matte Black) is the standard for the positions of the other colors.
| Note: |
|
|
|
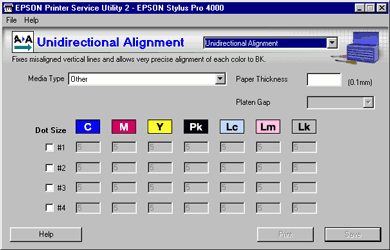
 | Select the media type you use from the Media Type list box. If you use non-EPSON media, select Other. |
| Note: |
|
 | Set the Paper Thickness. |
If you selected EPSON genuine media name, the value appears automatically.
If you selected Other (non-EPSON media) for Media Type, type the value of the media in the Paper Thickness text box, from 1 to 16. For paper thickness information, see the specifications or contact the dealer for the media.
| Note: |
|
 | Set the Platen Gap. Platen Gap is the height from the media loaded into the printer to the print-head. By adjusting this parameter, you may produce better image quality. |
| Note: |
|
|
The table below illustrates which Platen Gap parameter is available for the paper thickness.
|
|
Platen Gap Parameters |
|||
|
Paper Thickness (mm) |
Narrow |
Standard |
Wide |
Wider |
|
0.1 to 0.2 |
|
|
|
|
|
0.3 to 0.6 |
N/A |
|
|
|
|
0.7 or more |
N/A |
N/A |
N/A |
|
 | Select an ink dot size from #1 to #4 depending on the media you use and the print mode you want to try. The table below illustrates which parameter is available for the media type and print quality. |
|
|
Print Quality* |
|||||
|
Media Type |
A |
B |
C |
D |
E |
F |
|
Premium Glossy Photo Paper |
- |
#2 |
#3 |
- |
#2 |
#3 |
|
Proofing Paper Semimatte |
- |
#2 |
#3 |
- |
#2 |
#3 |
|
Photo Quality Ink Jet Paper |
- |
#1 |
#2 |
#1 |
#2 |
#3 |
|
Enhanced Matte Paper |
- |
#1 |
#2 |
#1 |
#2 |
#3 |
|
Watercolor Paper - Radiant White |
- |
- |
- |
- |
#2 |
#3 |
|
Plain Paper |
#4 |
#1 |
#2 |
#1/#2 |
#2 |
- |
|
Plain Paper (line drawing) |
#4 |
#2 |
#2 |
#1/#2 |
#2 |
- |
|
Tracing Paper |
- |
#2 |
#2 |
#1/#2 |
#2 |
- |
| * Print Quality A: Draft, B: Speed, C: Quality, D: Normal, E: Fine, F: Super Fine, Super Photo, Advanced Photo, Advanced Photo 2880 |
For Print Quality, refer to the printer driver.
| Note: |
|
 | Select the checkbox on the left to your selected number, from among #1 to #4. The corresponding row will be enabled. |
 | Click Print to print an alignment sheet. |
 | Look at the alignment sheet. Find the alignment pattern in each set, one for each color, that is vertically aligned. In the example below, 8 shows the best alignment. |
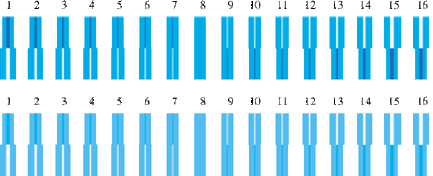
 | Enter the number of each aligned pattern in the corresponding boxes. In the example above, enter 8 in the appropriate color box. |
If you cannot find a properly aligned pattern, enter the number of the pattern that is closest to being aligned for that box.
 | Repeat the steps 7 and 8 for all colors. |
 | Click the Save button. If an on-line error message appears, select STANDARD for the platen gap setting from the control panel of the printer. For the control panel operation, refer to the Reference Guide for the printer. |
 Previous |
