How to Use EPSON LFP Remote Panel / Media Adjustment
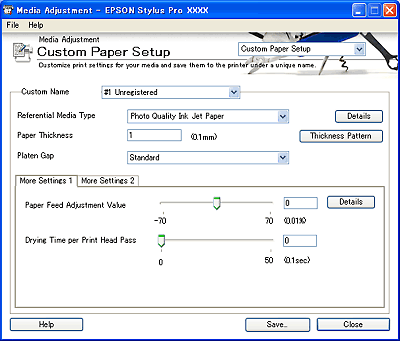
Click the Custom Paper Setup button in the Media Adjustment dialog box to display the Custom Paper Setup dialog box and then make a custom paper setting.
This function is useful for non-Epson special media.
When you are using the Epson printer driver and media, all settings in the Custom Paper Setup dialog box are automatically preset for optimal results and usually do not require any modification.
Custom Paper Setup settings for media include the following:
More Settings 1:
More Settings 2:
The following table shows the reference items for various cases.
|
Case |
Reference Item |
|
When you are using non-Epson special media |
All items in Custom Paper Setup Dialog Box. |
|
When you are cutting and feeding thin or thick media |
Cut Method or Paper Suction in the Custom Paper Setup dialog box |
|
When vertical banding appears |
Paper Suction in the Custom Paper Setup dialog box, or increase the ink duty using the printer driver, RIP software, or application |
|
When widely spaced horizontal banding appears |
Auto Nozzle Check and Head Cleaning in the Auto Adjustment Dialog Box or Power Cleaning |
|
When thin light or dark horizontal micro banding appears |
Paper Feed Adjustment Value or Auto Nozzle Check and Head Cleaning in the Auto Adjustment Dialog Box |
| Note: |
|
To save new custom settings to the printer, select #X Unregistered from the list. To modify the preset settings, select the appropriate setting from #1 to #10.
| Note: |
|
|
To make new or modify custom settings for the printer, select the media type from the list. If you use non-Epson special media, select a media type that looks similar to your media.
To determine which Epson special media is most similar to your non-Epson special media, click the Details button. Media Type Detail Dialog Box is displayed.
This value automatically appears according to the Media Type setting. If you use non-Epson special media, modifying this value for your media. Refer to the paper specifications or print "Thickness Pattern" to find out the paper thickness.

| Note: |
|
|
Platen Gap is the height from the media loaded in the printer to the print head. By adjusting this parameter, you may produce better print quality. This is set automatically according to the Paper Thickness.
| Note: |
|
The following table shows which Platen Gap option is available for the paper thickness.
|
|
Platen Gap Options |
|||
|
Paper Thickness (mm) |
Narrow |
Standard |
Wide |
Wider |
|
0.1 to 0.3 |
|
|
|
|
|
0.4 to 0.8 |
N/A |
|
|
|
|
0.9 or more |
N/A |
N/A |
N/A |
|
Adjusts the paper feed value in 0.01% increments. If the paper feed value is too large, white horizontal micro banding may appear. If the paper feeding value is too small, dark horizontal micro banding may appear.
To eliminate the banding, set the test range by using the slider, or enter a value in the text box. To remove white banding, move the slider toward - 70. To remove dark banding, move the slider toward + 70.
| Note: |
|
To make more detailed settings, click the Details button. See Paper Feed Adjustment Detail Dialog Box.
Adds a waiting time when the print head reaches the end of every pass.
Set this value using the slider or text box. To improve the print quality by slow ink absorption on the media, set the value larger.
The drying time per print head pass can be set in 0.1 second increments, from 0 to 5 seconds.
| Note: |
|
Click the More Settings 2 tab to see the settings below.
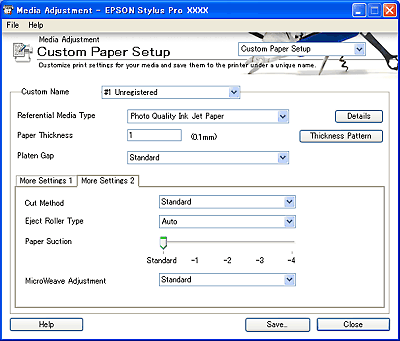
Select the best cutting method according to the paper thickness.
|
Standard |
Normal speed and normal cut pressure |
|
Thin paper |
Low cut pressure |
|
Thick paper, Fast |
High speed and high cut pressure |
|
Thick paper, Slow |
Low speed and high cut pressure |
Select the Eject Roller Type that best fits your media. Cut sheets cannot be completely ejected from the printer without activating the feed rollers.
|
Auto |
The printer selects the most appropriate setting automatically. When you use Epson special media, usually select this setting. |
|
Starwheel - Sheet |
If you want to print on cut-sheet paper that is non-Epson special media, select this setting. |
|
Starwheel - Roll Curled |
If you want to print on strongly curled roll paper that is non-Epson special media, select this setting.
Note: |
|
No Roller - Roll Normal |
If you want to print on roll paper that is non-Epson special media, select this setting. |
Decreasing the air suction at the platen is useful to avoid wrinkling or waving of thin or saturated media, or eliminating vertical banding. The relationship between the options and the suction power is indicated below.
|
Paper Suction Options |
EPSON Stylus Pro 4400/4800 |
EPSON Stylus Pro 7400/7800/9400/9800 |
|
Standard |
100% |
100% |
|
-1 |
50% |
84% |
|
-2 |
30% |
66% |
|
-3 |
10% |
50% |
|
-4 |
6% |
34% |
Standard is the default setting. When you select Epson special media in the proper driver or RIP software, the most appropriate setting is automatically set.
You can select #1 or #2 to find the most appropriate setting. Increase the number to give priority to the printing speed, decrease the number to give priority to the printing quality.
| Note: |
|

 | Click Save to save the setting to the printer. |
 | Select the appropriate number from the PAPER NUMBER list, and then enter a Custom Name. |
| Note: |
|
|
 | Click OK. |
The settings saved here will be applied after activating them from Activate Custom Paper Dialog Box.
You can import the custom settings in the Custom Paper Setup dialog box you saved.
|
| Select Import from the File menu. |
|
| Select the folder where the file for importing is located, and then specify the filename. |
|
| Click Open. |
You can export the custom settings in the Custom Paper Setup dialog box you saved.
|
| Select Export from the File menu. |
|
| Select the location where you want to save the file, and then enter the filename. |
|
| Click Save. |
 Previous |
 Next |
