|
Using a syringe:
A clogged print head can be cleaned with ease as long as you are careful. There are two common methods to clean the print heads.
The first is using a syringe and cleaning solution
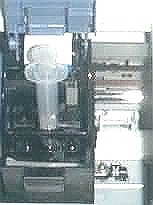
Turn the printer on and lift the top cover to it's open position.
Initiate a cleaning cycle or; push the paper feed or cartridge change button and hold for three seconds. When the print head (carriage) starts to move from it's parked or home position on the right side. Immediately disconnect it from electrical outlet.
Locate the "sponge pads" to apply the cleaning solution: Gently push the carriage/print head to the left out of the way to gain access. The cap assembly is located just below where the carriage parks on the right. The sponge pads are on the left side of or under it depending on your printer model. Use a cotton swab or folded paper towel to soak up excess ink on the pads. Note the newer model Epson printers do not have the sponge pad. So if you don't see the sponge pad just skip that step.
Now you can place a folded paper towel or coffee filter under the print head. In some cases you may need to cut the filter/paper towel into strips to have them slip under the print head.
The filters/paper towel serve two functions the first is it will help prevent the liquid from leaking into the printer and the second it will help to wick the ink out of the print head.
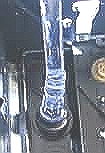
Next draw some cleaning solution/distilled water into the syringe and place the syringe over the ink inlet post (see photos one and two below) And then very s l o w l y start to inject the cleaning fluid/distilled water into the ink inlet post. If you use too much pressure you will damage the print head.
Usually a few cc's in each post will do the job. But some may need more and some will need to be cleaned several times to completely unclog the print head. Once you have injected the solution into the ink inlet posts you should let the print head soak for at least 3 hours or over night if you want. Basically the longer it soaks the better but, you will want to keep checking the paper towel/coffee filters to see if they have dried out. Now slide the print head slightly side to side a few times to remove any foreign matter from the face of the print head. For more info try here.
Once you are finished print a test page.
Using a old ink cartridge:
The second way is to inject the cleaning fluid into a used/empty ink cartridge
(making it into a cleaning cartridge) and then just run a few head cleanings then print a few pages
of large pictures.Once you are finished cleaning just remove the "cleaning cartridge"
you made and place it into a zip lock bag until the next time you need it.
This method does work but is much less effective.
Things not to do.
Do not use Window cleaners, Alcohol, Bleach, Peroxide, Lighter fluid, degreasers, engine cleaners, mineral spirits or laquer thinner.
Also do not use force or compressed air as these these can cause serious damage to the print head.
For the syringe anything from 1ML to 10ML will work. I usually use a 2.5 or 5 CC syringe but I have used a 10CC syringe on the really stubborn print heads. The Epson print head cleaning kit comes with a 1ML syringe. CC is the same as ML so a 5CC syringe is the same as a 5ML syringe. You can usually get a syringe from pet shops or feed and grain stores. Or in most ink cartridge refill kits. cc = cubic centimeters ml =
milliliters.
Taken from inkjetprinterhelp.us
Instructing you how to clean printhead is
currently outside the scope of our support assistance (though we have done this
task ourselves with minimum fuss). You may like to refer to our
Service Manuals page.
|